Back to homepage 05 feb 2021
I assume the share is already made and accessible from Windows. This will be using SMB3 protocol so there is no need to enable the legacy SMB in Windows (luckily).
Thoughout this short guide, the example user on the Windows machine is called joe, the machine IP is 192.168.0.2 (hostname photon, and the workgroup is called LABORATORY
sudo apt install samba samba-client cifs-utils gvfs-backends
These are the packages necesary on the debian client macine
Use this command to see if the SMB connection can be made to the remote machine
$ smbclient -U joe -L 192.168.0.2 -W LABORATORY -m smb3
WARNING: The "syslog" option is deprecated
Enter joe's password:
Domain=[photon] OS=[] Server=[]

	Sharename       Type      Comment
	---------       ----      -------
	ADMIN$          Disk      Administracja zdalna
	C$              Disk      Domyślny udział
	D$              Disk      Domyślny udział
	myshare         Disk
	IPC$            IPC       Zdalne wywołanie IPC
	print$          Disk      Sterowniki drukarek
	Users           Disk
Domain=[photon] OS=[] Server=[]

	Server               Comment
	---------            -------

	Workgroup            Master
	---------            -------
The Comment field is configurable in the share properties and the defaults depend on the remote machine locale
Note that if there are mounted shares in Thunar, the above command will fail for some reason
Edit /etc/samba/smb.conf
[global]

## Browsing/Identification ###

# Change this to the workgroup/NT-domain name your Samba server will be part of
workgroup = LABORATORY
client min protocol = SMB3
client max protocol = SMB3
This will force it to use the new SMB3 protocol version. The older versions are disabled by default in modern Windows
Then, reload samba config with
smbcontrol smbd reload-config
Modify /etc/nsswitch.conf to add WINS to the resolver list:
hosts: files wins mdns4_minimal [NOTFOUND=return] dns myhostname
This will allow you to connect to the machines by their hostname, not only by IP:
$ ping photon
PING photon (192.168.0.2): 56 data bytes
64 bytes from 192.168.0.2: icmp_seq=0 ttl=128 time=3,124 ms
thunar smb://photon
If all went well, you should see a dialog with a login prompt. Type in the correct values, check the credentials persistence option that suits you and press OK. After a moment it should list all the shares on the machine. You should be able to browse them (keep in mind that it takes some time to open one, especially if it's full of files). After you open one, it's a good idea to bookmark it.
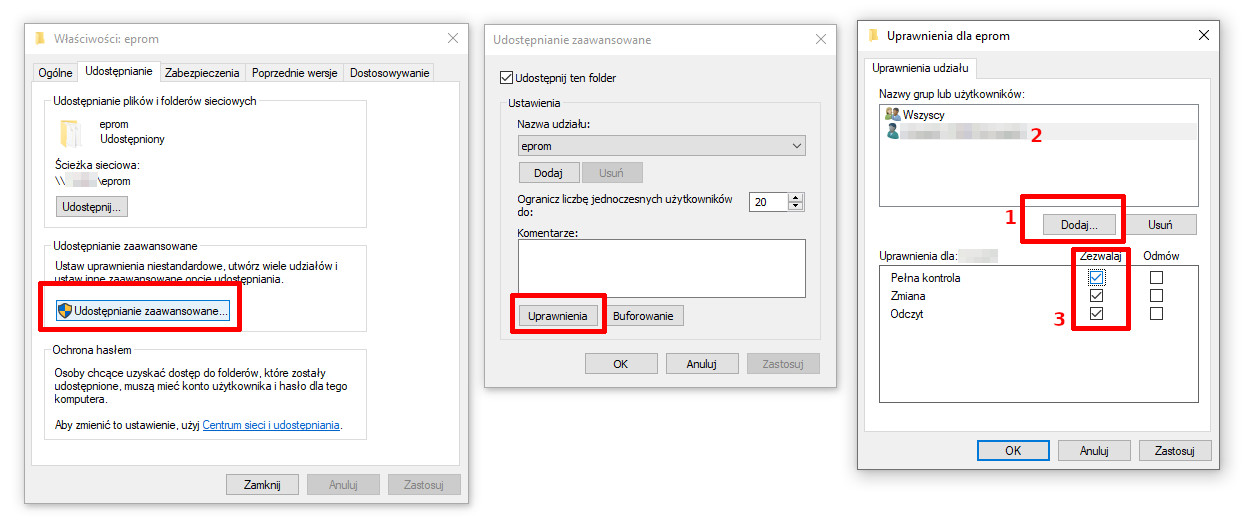
It seems that Windows by default shares as read-only. To change that, right click on the share root folder (or any other folder in the share), enter Properties -> Sharing -> Advanced sharing -> Permissions. It should have an entry called Everyone. We want to add an entry for your user. To do that, click Add. A dialog box will appear. type in your HOST\username respectively (you can also just type the username in and click Check names). Click OK. A new entry should appear in the list. Select it and check Full control in the bottom part of the window.
Now you should be able to write to the share from your Linux machine
That's all. On the first machine it took me 3 days to figure this out. On this new laptop I was copying files back and forth within 2 hours. Progress! Although it's still slow as molasses :-)